Your Complete Guide to LinkedIn Post Specs
Master LinkedIn with our guide to LinkedIn post specs. Get the latest dimensions, character limits, and best practices for images, videos, text, and more.

Nailing your LinkedIn post specs is actually pretty simple once you know the core numbers. For images, think 1200 x 627 pixels for shared links and a clean 1080 x 1080 pixels for square posts. Videos get a generous 10 minutes, and document uploads can stretch up to 300 pages. Sticking to these specs is the secret to making your content look sharp and professional every time, avoiding those dreaded awkward crops.
A Quick Reference Guide to LinkedIn Post Specs
Let's be honest, navigating the technical requirements for every type of LinkedIn post can feel like a chore. But getting it right upfront saves you a ton of headaches and seriously boosts your content's performance. Every format—from a simple text update to a slick document carousel—has its own rules for dimensions, file sizes, and character counts.
Understanding these details is the first step to creating content that doesn't just look good but actually stops the scroll. Properly formatted visuals are your best weapon for grabbing your audience's attention. I've put this guide together for busy professionals who need the right numbers, fast, without having to dig through a dozen different help articles.
To make things even clearer, this infographic breaks down the most critical specs for images, videos, and documents at a glance.
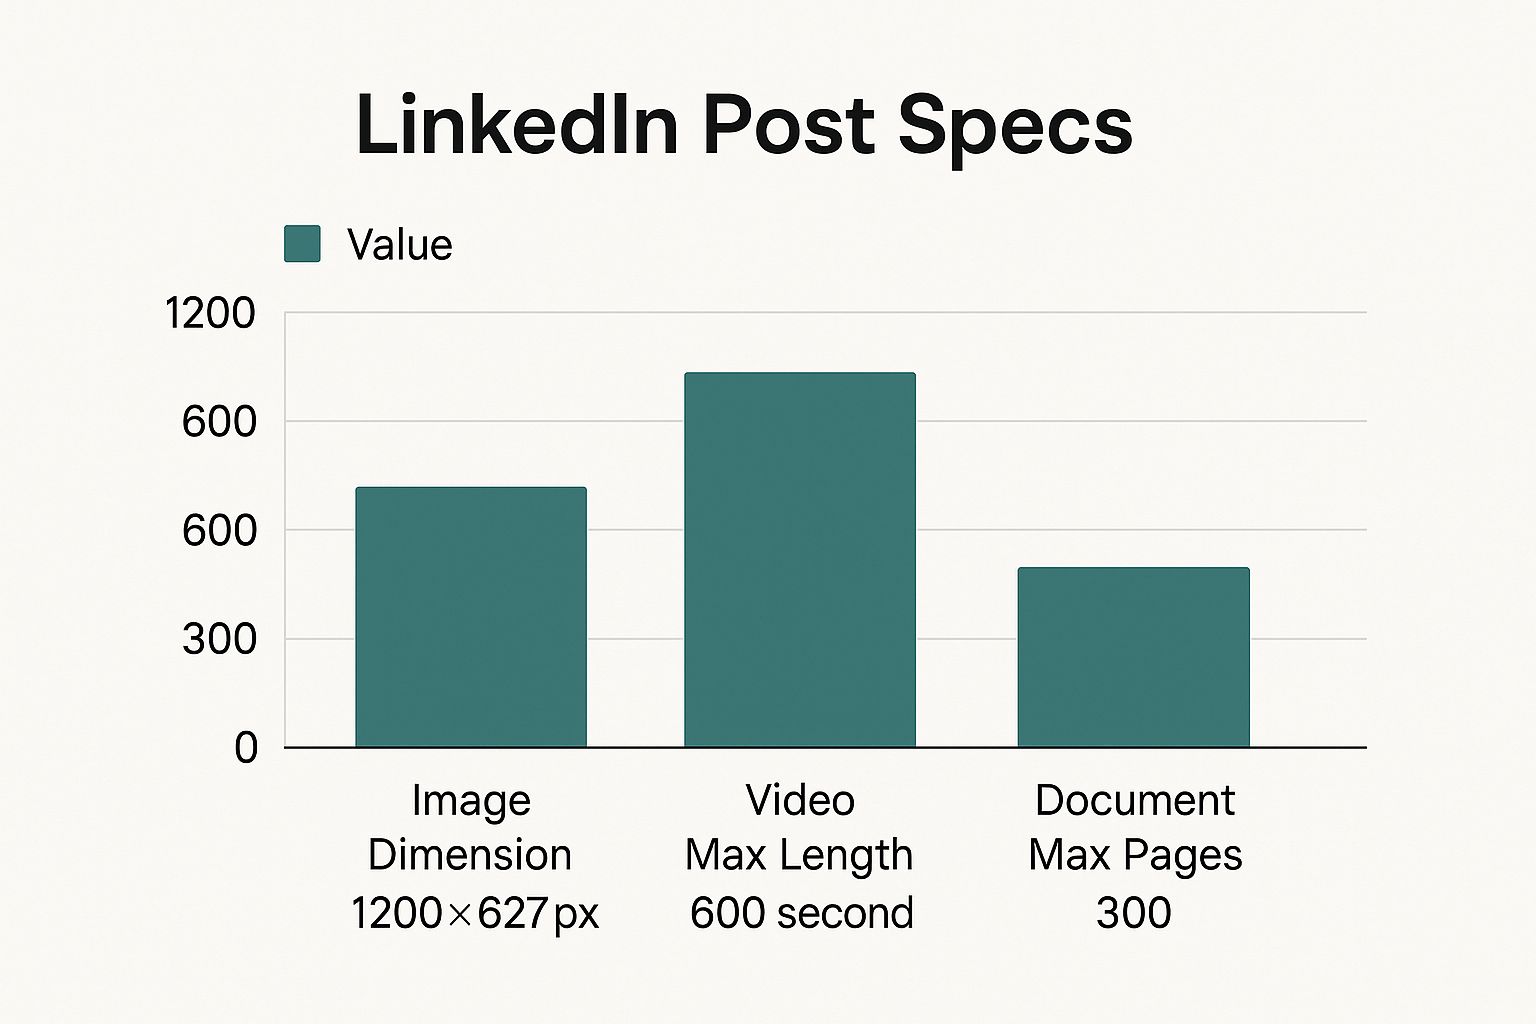
You can see how LinkedIn gives you a lot of room to play with when it comes to long-form content like videos and documents. They're clearly encouraging creators to share deep, valuable knowledge.
LinkedIn Post Specifications at a Glance
For those times you just need the numbers and nothing else, this table is your go-to reference. It’s a clean, at-a-glance summary of the most important specs for every major post type on LinkedIn.
I highly recommend bookmarking this page. Getting these specs right consistently is one of those small details that makes a massive difference in how professional your personal brand or company comes across. It shows you care about quality and respect your audience's time.
| Post Type | Key Specification | Recommended Value |
|---|---|---|
| Image (Shared Link) | Dimensions | 1200 x 627 pixels (1.91:1 ratio) |
| Image (Square) | Dimensions | 1080 x 1080 pixels (1:1 ratio) |
| Video | Maximum Length | 10 minutes (600 seconds) |
| Video | File Size | 75 KB to 200 MB |
| Document (Carousel) | Maximum Pages | 300 pages |
| Document (Carousel) | Maximum File Size | 100 MB |
| Text Post | Character Limit | 3,000 characters |
Use this cheat sheet before you hit "Post" to ensure everything looks exactly as you intended. No more surprises after publishing.
Optimizing Text and Link Post Specifications
Text and link posts are the absolute bedrock of any good LinkedIn strategy. They're quick, accessible, and perfect for sharing an article, asking a question, or sparking a conversation.
But just dropping a link with a line of text won't cut it. The real magic happens when you understand the specs that make these posts work, especially character limits and those all-important link preview images. Getting this right is the difference between a post that gets scrolled past and one that gets clicks.
Mastering the Character Count
LinkedIn gives you a pretty generous 3,000-character limit for your posts. But let's be honest, the only part that really matters at first is the initial 210 characters.
This is your hook. It's everything a user sees before they have to commit to clicking that "...see more" link. Your opening has to be strong enough to stop the scroll, instantly show value, and make them curious enough to expand your post.
Think of it as your post's headline. Start with a provocative question, a surprising stat, or a bold statement. Your goal is to get your core message across immediately, even to the most casual browser. If you're ever stuck staring at a blank page, a solid headline generator can be a great, cost-effective source of inspiration for crafting that killer first line.
Once you’ve nailed the hook, use the rest of the space to add depth. Break up longer thoughts into short paragraphs, use bullet points for lists, and sprinkle in emojis to guide the reader’s eye.
Best Practices for Readability and Reach
An engaging post isn't just about what you say; it's about how you say it. To get the most out of every post, you need to think about formatting and tagging.
- Hashtags: Stick to 3-5 highly relevant hashtags. This helps LinkedIn categorize your content and show it to people beyond your immediate network. Tucking them at the end of your post keeps the main body clean.
- Tagging: Use the "@" symbol to mention relevant people or companies. This sends them a notification, which often encourages them to engage and share it with their own followers. Just be ethical—only tag those who are genuinely connected to your content. Nobody likes spammy tags.
- White Space: Dense blocks of text are a killer, especially on mobile. Use short sentences and single-line paragraphs to give your words room to breathe. It makes a huge difference in readability.
Pro Tip: Think of your post like an inverted pyramid. Put your most critical information and call-to-action in the first 210 characters. Follow that with the supporting details, and finish with your hashtags and any final context.
Perfecting the Link Preview Image
When you share a link, LinkedIn automatically creates a preview card with a title, a short description, and an image. That visual element is what grabs attention and drives clicks.
For a sharp, professional-looking preview, the ideal image size is 1200 x 627 pixels. This is a 1.91:1 aspect ratio. Using these exact LinkedIn post specs prevents the platform from awkwardly cropping or stretching your image, which can make your post look sloppy.
If the featured image on the source webpage (often called an Open Graph or OG image) is too small or the wrong shape, LinkedIn will do its best to resize it, but the results are rarely pretty. The best practice is to always make sure your own blog posts and web pages have a high-quality, correctly sized OG image ready to go.
Mastering LinkedIn Image Post Specifications
Visuals are your secret weapon for stopping the scroll on LinkedIn. A sharp, well-framed image gets your point across in a split second and can dramatically boost engagement.
But LinkedIn’s feed has its own set of rules for displaying images. If you ignore them, you risk awkward cropping, blurry visuals, or having the most important part of your graphic cut off. Getting the specs right is non-negotiable for creating quality, accessible content.
Single Image Post Dimensions
When you’re posting a single image, you have a few options, but one format consistently delivers the best results.
For a square image, the ideal size is 1200 x 1200 pixels, which is a 1:1 aspect ratio. This format is king on mobile devices, which is where most people will see your content anyway.
If you prefer a landscape orientation, aim for 1200 x 627 pixels (a 1.91:1 aspect ratio). This is the same dimension LinkedIn uses for link preview images, so it gives your feed a clean, professional look.
To make sure your images always look crisp, it's a good idea to nail these dimensions before you hit "post." If you need a hand, a dedicated and often free LinkedIn Photo Resizer tool can make the process painless.
Multi-Image and Carousel Posts
LinkedIn lets you upload several images at once, arranging them into a collage or a swipeable carousel. This is a fantastic way to tell a visual story, show off photos from an event, or break down a complex idea into simple steps.
How LinkedIn displays these depends on how many images you upload and their orientation. The best practice here is to keep the aspect ratio consistent across all images to maintain control over the final look.
- Two Images: LinkedIn will place them side-by-side. For a clean vertical display, use two images at 900 x 1200 pixels each.
- Three Images: This gets tricky. One image appears larger on the left, with two smaller ones stacked on the right.
- Four or More Images: Your images will show up in a simple grid. Square images, like 1080 x 1080 pixels, work perfectly for this.
The data on this is crystal clear: posts with images get a massive 98% more comments than text-only posts. To really make this work for you, try to post when your audience is most active—usually mid-mornings and around lunchtime, Tuesday through Thursday.
Technical Requirements and Alt Text
Beyond just the dimensions, a few technical details make a big difference in performance and accessibility. Following these guidelines ensures your images load fast and can be understood by everyone.
File Specifications:
- Supported File Types: You're safe with PNG, JPG, and GIF files.
- Maximum File Size: Keep your image under 5 MB. Anything larger might fail to upload or will be slow to load for your audience, which is a killer for engagement.
Finally, don't ever skip the alt-text (alternative text). This is a short description of your image that makes your content accessible to visually impaired users relying on screen readers. It's an ethical responsibility to ensure everyone can understand your content. It also gives search engines context about your visual, offering a small but meaningful SEO advantage. A great alt-text is concise and accurately describes what's in the image.
A Complete Guide to LinkedIn Video Specs
Video is an absolute powerhouse on LinkedIn. It lets you convey complex ideas, show off your personality, and build connections in a way static images and text just can't match. But to get the most out of it, you need to play by the platform's rules.
Getting the technical specs right ensures your video plays smoothly, looks sharp, and doesn't get awkwardly cropped. Ignoring them is a surefire way to run into upload errors or poor playback, killing your message before anyone even sees it.
Core Technical Requirements for LinkedIn Video
LinkedIn gives you a pretty flexible set of rules for video, but they are specific. Nail these basics, and you're already on the right track. If you find yourself wrestling with settings, you might find that affordable tools specifically designed to resize video for LinkedIn can be a huge help.
Here are the key numbers you need to have locked in:
- Video Length: Must be at least 3 seconds long, but no more than 10 minutes.
- File Size: Keep it between 75 KB and 200 MB.
- File Formats: LinkedIn is friendly with the most common formats, including MP4, AVI, and MOV.
While you can post a 10-minute deep dive, that doesn't always mean you should. The sweet spot for most successful videos on LinkedIn is much shorter—typically under two minutes. Professionals are busy, so get to the point quickly and respect their time.
Resolution and Aspect Ratio Recommendations
Your video's visual quality is just as important as the message itself. While LinkedIn supports a wide range of resolutions, you should always aim for the best quality your file size limit will allow.
Key Takeaway: You can upload anything from 256x144 all the way up to 4096x2304. However, a standard 1080p (1920x1080 pixels) video hits the perfect balance between crisp quality and a manageable file size.
When it comes to shape, or aspect ratio, you've got a few solid options that look great in the feed:
- Landscape (16:9): The classic widescreen format. This is your go-to for professionally shot interviews, webinars, or presentations.
- Square (1:1): My personal favorite. Square videos take up more real estate on a mobile screen, making them fantastic for stopping the scroll.
- Vertical (9:16): While less common for feed posts, this format is perfect if you're repurposing content from platforms like Instagram Stories or TikTok.
The Importance of Captions and Accessibility
This is non-negotiable. A huge number of people watch videos on LinkedIn with the sound off, whether they're in a quiet office or on a noisy commute. If your video relies on a voiceover or someone speaking, you absolutely must add captions.
LinkedIn makes this easy by letting you upload a separate caption file in .SRT (SubRip Subtitle) format right after your video is uploaded. This simple, ethical step makes your content instantly accessible to a much broader audience, including those who are deaf or hard of hearing. It guarantees your message lands, no matter how someone is watching.
Maximizing Engagement with Document Posts
Document posts, which you’ll often hear called carousels or sliders, are hands-down one of the most powerful formats on LinkedIn right now. They let you package deep-dive content—think presentations, reports, or case studies—into a snappy, interactive format that keeps people swiping.
This format is a game-changer. Instead of just dropping a link and sending users away from the platform, you bring your best content directly into their feed. It’s an open invitation for immediate interaction and a brilliant way to make your expertise accessible. When done right, these posts don't just get likes; they build your reputation as a thought leader.
Core Document Post Specifications
Before you dive into design, you need to know the rules of the road. Getting these LinkedIn post specs right from the start means a flawless upload and a smooth experience for your audience.
- Supported File Types: You can upload PDF, PPT, PPTX, DOC, and DOCX files. My personal recommendation? Stick with PDF. It’s the most reliable option for making sure your formatting stays exactly as you designed it.
- Maximum File Size: Keep your file under 100 MB.
- Page Limit: You get a massive 300 pages (or slides) to work with.
While the platform gives you a lot of room, remember this: the best carousels are rarely the longest. They’re the ones that are focused, visually engaging, and get straight to the point.
Strategic Design for Maximum Impact
A great document post is so much more than a file upload—it's a carefully crafted visual experience. The first slide is everything. It’s your hook, and it has to grab attention in a split second. A compelling cover with a bold title and a striking graphic isn't just nice to have; it’s non-negotiable if you want that first click.
If you’re staring at a blank canvas wondering how to start, a strong hook generator can be a great way to spark ideas for a title that demands to be read, and many are available for free.
Inside the document, make readability your top priority. Use large, clean fonts and embrace white space. Break down your big ideas into one key point per slide, mixing text with icons and images to keep your reader engaged. Think of each slide as a mini-infographic that can be understood in just a few seconds.
Key Insight: Treat your document post like a visual story. It needs a clear beginning (the cover), a middle (your core points), and an end (a powerful call-to-action slide). Your job is to guide the reader logically from one slide to the next.
The data backs this up, by the way. Document posts pull in a massive 6.1% engagement rate, which is a staggering 596% higher than a simple text post. It proves that when you invest the time to create valuable, well-designed documents, both the LinkedIn algorithm and your audience will reward you for it. For more data like this, check out the insights over at wavecnct.com.
Strategic Posting Frequency and Timing
Knowing the perfect LinkedIn post specs is only half the battle. Figuring out when and how often to post is what turns a good strategy into a great one. The LinkedIn algorithm rewards consistency, so finding a posting cadence you can actually stick with is the key to building momentum.
It’s not just about flooding the feed; it’s about posting smarter. Your goal is to show up regularly in your network's feed without overwhelming them. This creates a reliable presence that builds trust and signals to the algorithm that you're an active, valuable contributor, which can lead to better reach over time.
Finding Your Ideal Posting Cadence
So, what's the magic number? While there’s no single answer for everyone, the data is pretty clear: posting more than once a week makes a significant difference. Upping your output keeps you top-of-mind and gives the algorithm more content to test and distribute.
For example, simply jumping from one post per week to between two and five posts can boost your impressions by an average of 1,182 per post and lift your engagement rate by 0.23 percentage points. You can dig into the full details in Buffer's research on posting frequency.
This chart from their study shows a clear link between how often you post and how much your impressions and engagement grow.
As you can see, that jump from one post a week to two delivers a serious boost. It's proof that even a small increase in consistency can pay off in a big way.
Identifying Peak Engagement Times
Frequency gets you in the game, but timing is the force multiplier. When you post at the exact time your audience is most active, you dramatically increase the odds of getting that crucial early engagement. That initial burst of likes and comments is a powerful signal to the LinkedIn algorithm.
Key Takeaway: For most B2B audiences, the sweet spot is during business hours. Think mid-mornings (9-11 AM) and around lunchtime (12-1 PM), especially from Tuesday to Thursday.
But remember, this is a starting point, not a rule. Your specific industry and audience might have totally different habits. Use these times as your baseline, but keep a close eye on your own analytics to pinpoint when your followers are actually online and interacting.
You can also take the guesswork out of it by using a scheduler. We put together a comparison of Taplio and similar platforms that can help you find affordable options to automate your posting for these peak times. Ultimately, the best strategy is the one that's consistent and lines up with your audience's behavior.
Frequently Asked Questions About LinkedIn Specs
Let's be honest: navigating LinkedIn's technical specs can feel like trying to hit a moving target. Just when you think you've got it all figured out, a blurry image or a cropped video throws a wrench in your content plan. It happens to everyone.
This section is here to give you direct, no-nonsense answers to the most common questions and frustrations I hear about LinkedIn's post requirements. Getting these details right is the difference between content that looks sharp and professional, and content that looks sloppy. Let's clear up the confusion.
What Is the Best Image Size for a LinkedIn Post?
For a standard single image or a shared link preview, your go-to dimension should be 1200 x 627 pixels. This 1.91:1 aspect ratio is LinkedIn’s sweet spot for landscape images, and it’s your best guarantee that nothing gets awkwardly cropped or pixelated. It’s the safe, professional choice.
That said, if your audience is scrolling on their phones (and most of them are), square images often perform better. For those, use 1080 x 1080 pixels (a 1:1 ratio). This format simply takes up more screen real estate on mobile, giving you a better chance to stop the scroll.
How Long Can a LinkedIn Video Be?
Technically, you can upload a native video that’s anywhere from 3 seconds to 10 minutes long. But just because you can upload a 10-minute video doesn’t mean you should. The most successful videos on the platform are almost always much shorter.
My advice? Keep your videos under 2 minutes. Professionals are busy, and attention spans are incredibly short. Your video needs to grab them in the first few seconds and deliver its message quickly.
Think about it from their perspective: they're likely scrolling during a quick break. A concise, high-impact video will always beat a long, rambling one. Get to the point.
Why Does My Shared Link Image Look Blurry?
This is easily one of the most frustrating problems on LinkedIn. You share a link to your latest blog post, and the preview image is a blurry, distorted mess. The culprit is almost always the original image on your website.
When you paste a link, LinkedIn scans the webpage for an "Open Graph" (OG) image tag to generate that preview. If the image it finds is smaller than 1200 x 627 pixels or has the wrong aspect ratio, LinkedIn tries to stretch or crop it to fit. The result is... well, you've seen it.
Here’s how to fix it for good:
- Go back to the source webpage or blog post.
- Change the featured or OG image to the proper 1200 x 627 pixel dimension.
- Then, use LinkedIn's Post Inspector tool. Paste your link there to force LinkedIn to "re-scrape" the page and pull in the new, corrected image.
What Is the Real Character Limit for a LinkedIn Post?
The official character limit for a post is 3,000 characters, and that applies to both personal profiles and Company Pages. It's a generous amount of space, perfect for sharing detailed stories, deep insights, or comprehensive breakdowns.
But the "real" limit—the one that actually matters for getting people to read your post—is the first 210 characters. This is all a user sees in their feed before LinkedIn hides the rest behind a "...see more" link. If your hook doesn't land in that tiny space, you’ve lost them. Your most important point has to be right at the top.
Tired of manually checking specs and fighting with content formats? Contentide is an AI-powered LinkedIn content generator that helps you create high-performing, authentic posts in minutes. It's designed to be an affordable solution that takes the guesswork out of content creation so you can focus on building your network ethically. Try it for free at https://contentide.com.
Hope you found this helpful. Feel free to share your thoughts.